How to post Version Numbers in Quest
FIRST: You have to know where to go and GET the version numbers as assigned to students. The following graphic should help you with that.
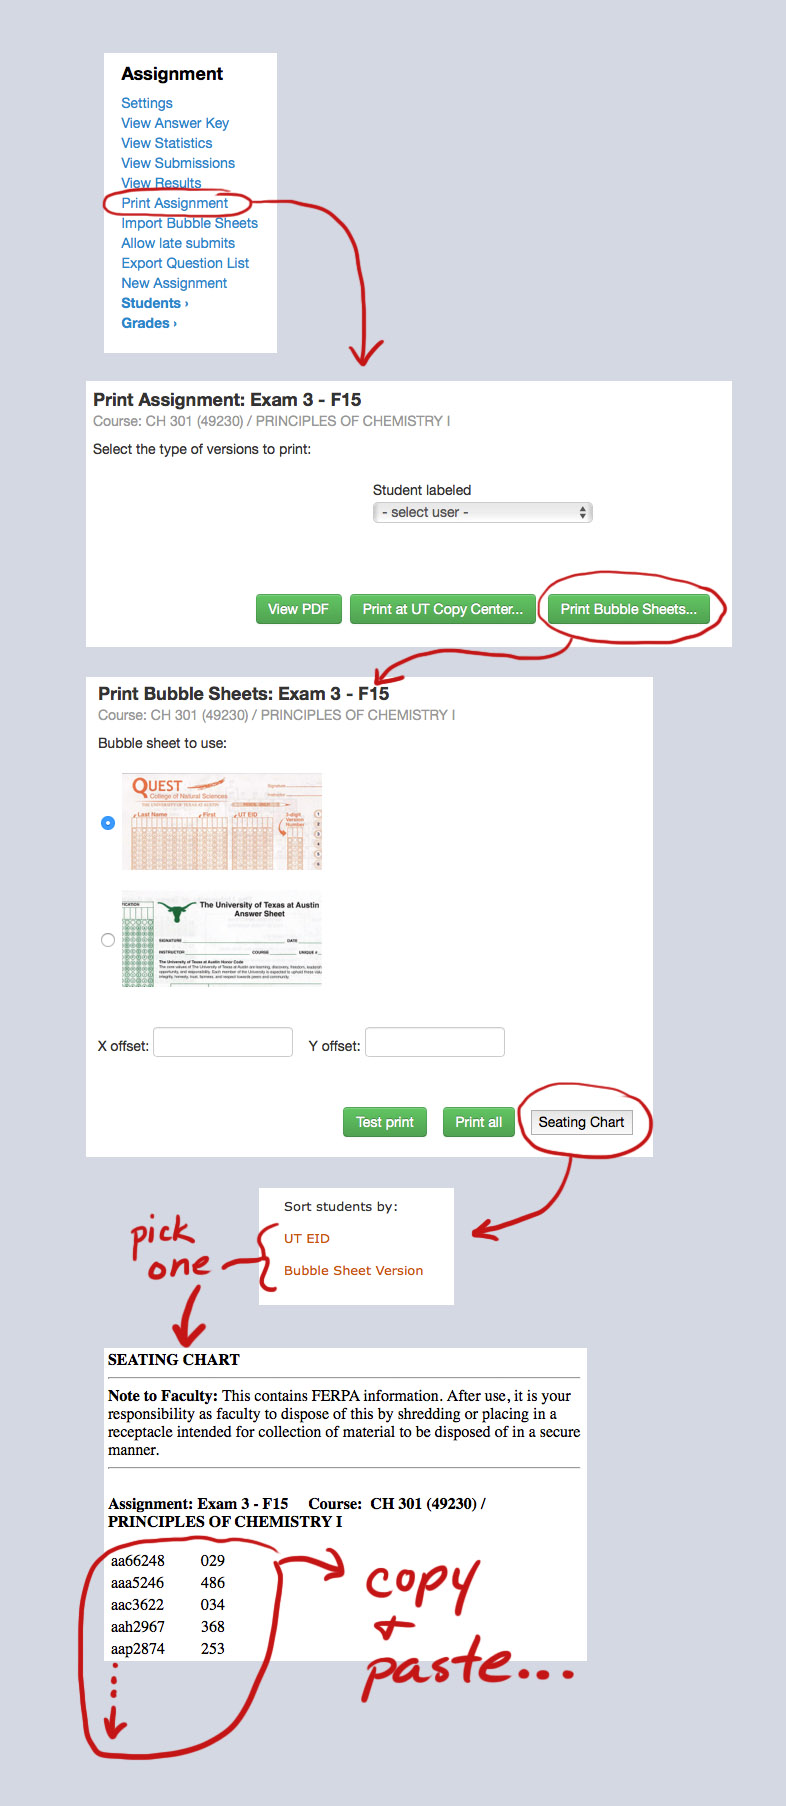
If you post back to Quest, make sure your listing is by uteid. You need the uteid listed first, followed by "white space" (tab or space) and then number. If you are posting into Canvas, then you'll need to do a vlookup and match uteids to assign the version numbers in your Canvas spreadsheet.
Let's assume you selected and properly started with "001..." and then when all the way to the bottom to the last version number and student eid. You COPIED this to the clipboard. Now before you do anything else...
IMPORTANT! Do NOT pull (copy and paste) this info into Excel! Excel will try to render certain EIDs as dates - any eid that starts with a common monthly abbreviation like "jan" or "feb" or "mar". Avoiding MSWord is a good idea too. Just copy into a plain text editor (TextEdit on Mac, Notepad on PC).
SECOND: You have your empty text only doc opened and you PASTE all that goodness into the document.
THIRD: You save that document as a TEXT ONLY file that you can easily find later. Make sure it is just text and not any kind of markup language. Plain text, plain text, plain text... see, I said it a lot because it is important.
No Instructions here for Canvas Upload - you already know how, right?
Instructions for Posting back into Quest
Now you have to post that information back into Quest. Here are the steps.
- Click "New Assignment"
- Next page - check and see if there is a Type of Assignment named "Version", if it is there, then select it, if not, then do step 3.
- How to create a new ASSIGNMENT TYPE in Quest named "Version". This step only has to be done ONCE for the whole semester, because that type is reused over and over.
- In the left menu bar go to Grades and Select "Grading Scheme"
- Next page click on "Add Type"
- Next page type in a name for the type like "Version"
- Adjacent to that on the pulldown menu, select "Manual"
- Scroll down and click "Save Changes"
- Now you have a new type of assignment called "Version"
- Name your new "Version" type assignment "Exam# version" putting the actual number in for #.
- Set max score to 100.
- Click the "Create" button. Wait, wait,... Quest is making the "assignment" which is really just a place holder for a number or score.
- Ahhh, done! New screen. Assignment looks rather barren though.
- In the left margin, click on "Import Grades"... wait, wait,...
- Now you should be seeing a page with names, eids, and a "Points earned" column which now has all zeros in it.
- Hand enter all 500 version numbers into those boxes. OR... if you'd rather not do that...
- Click on the little check box at the top that says "Import from file".
- A new line appears - click on "Choose File"
- A system pop-up appears and you browse for that file you made earlier. Select it and click "choose".
- Now click "Import Grades"
- Wait, wait, wait,... takes awhile and then it is done.
- You're finished
REMEMBER: Click on the version number assignment and go to settings and MAKE SURE students can SEE the assignments grades/versions. Properly SET the "Date grades are viewable by students". If you leave it blank, they will NOT see the scores (versions).